Problem
This is the third example to illustrate how we can layout and align PHP-GTK widgets using HTML. (Links: first example, second example)
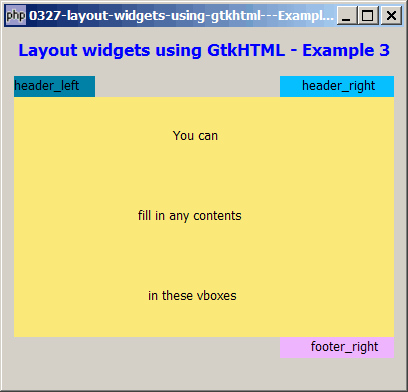
In this third example, we will produce the following output using GtkHTML as shown below. This is a pretty common layout of a typical application — a body with some header information displayed on the top-left and topright, and also a footer information on the bottom right.
Solution
- No doubt you can produce this using plain PHP-GTK2. However, you do need to have a good understanding of hbox, vbox and the
expandparameter to be able to align the various vboxes. - We make use of the techniques as outlined in How to left or right align text using gtkhtml? and How to embed gtk widgets within html text using gtkhtml?
Note that GtkHTML honors HTML attributes such as width=100%, width=10%, colspan=3, align=right, etc. See how straightforward and intuitive it is to layout widgets using GtkHTML!
Important Note:
- This only works for PHP-GTK2 compliled with the additional library GtkHTML.
- For linux, you have to recompile php-gtk2 to include this library.
- For windows, you may refer to the article How to install PHP-GTK2 on windows. The latest beta release from official php-gtk2 website comes complete with GtkHTML.
- In the
php.ini, don't forget to addphp-gtk.extensions = php_gtk_html2.dllto turn on GtkHTML. - Lastly, the most "tricky" part in running GtkHTML is that to run this script, you have to use gconfd-2 | php script.php. If you have installed the beta release of PHP-GTK2 on windows as outlined in this article, you will find the program gconfd-2.exe in the root directory of php-gtk.
- In the event that you cannot get this sample code to work, I would suggest that you try to do a fresh install of the beta-release of PHP-GTK2 (details here). It should work out-of-the-box (just need to add
php-gtk.extensions = php_gtk_html2.dllin php.ini as explained above). Note that you can still keep your original copy of php-gtk2 while having this new version. - You will most likely see the warning
(php.exe:5348): Gdk-WARNING **: gdkselection-win32.c:1068: OpenClipboard failed: Invalid window handle.. Not really sure how to fix this yet. The script seems to run ok, though.
Sample Code
| 1 2 3 4 5 6 7 8 9 10 11 12 13 14 15 16 17 18 19 20 21 22 23 24 25 26 27 28 29 30 31 32 33 34 35 36 37 38 39 40 41 42 43 44 45 46 47 50 51 52 54 55 66 67 68 69 70 71 72 73 74 75 76 77 78 79 80 81 82 83 84 85 86 87 88 89 92 93 94 97 98 99 100 101 103 105 107 108 109 110 111 112 113 114 115 116 117 118 119 123 125 126 127 128 129 130 131 132 133 134 135 136 137 138 139 140 141 | <?php $window = new GtkWindow(); $window->set_title($argv[0]); $window->set_size_request(400, 360); $window->connect_simple('destroy', array('Gtk','main_quit')); $window->add($vbox = new GtkVBox()); $window->realize(); $org_bg = $window->get_style()->bg[Gtk::STATE_NORMAL]; // init entry fields $vboxes = array(); $object_count = 0; // setup GtkHTML $gtkhtml = new GtkHTML(); $vbox->pack_start($gtkhtml); $html_text = "<p align=center><b><font size=+1 color=blue> Layout widgets using GtkHTML - Example 3</font></b></p> <table border=0 cellpadding=0 cellspacing=0 width=100%> <tr> <td bgcolor=#0081A6 width=10%> <OBJECT classid=vbox_header_left></OBJECT> </td> <td></td> <td bgcolor=#06BFFF align=right width=30%> <OBJECT classid=vbox_header_right></OBJECT> </td> </tr> <tr> <td colspan=3 bgcolor=#FAE97A align=center> <OBJECT classid=vbox_body></OBJECT> </td> </tr> <tr> <td></td> <td></td> <td bgcolor=#EEB5FF align=right> <OBJECT classid=vbox_footer_right></OBJECT> </td> </tr> </table> "; $gtkhtml->connect('object-requested', 'on_object_requested'); $gtkhtml->load_from_string($html_text); $gtkhtml->modify_base(Gtk::STATE_NORMAL, $org_bg); $vboxes['body']->pack_start(new GtkLabel('You can')); // note 6 $vboxes['body']->pack_start(new GtkLabel('fill in any contents')); $vboxes['body']->pack_start(new GtkLabel('in these vboxes')); $vboxes['body']->show_all(); $window->show_all(); Gtk::main(); function on_object_requested($gtkhtml, $gtkhtmlembedded) { // the following is supposed to return the classid of the object // but it doesn't seem to work... $object_id = $gtkhtmlembedded->classid; // until we find out how to get the object_id // we will just do a hardcode mapping of the the object_id global $object_count; $object_id_mapping = array( 'vbox_header_left', 'vbox_header_right', 'vbox_body', 'vbox_footer_right'); // note 1 $object_id = $object_id_mapping[$object_count]; ++$object_count; if (!preg_match('/([a-zA-Z]+)_+?(.+)/', $object_id, $matches)) return; $widget_type = $matches[1]; // note 2 $widget_id = $matches[2]; // note 3 switch($widget_type) { // note 4 case 'entry': $entry = $fields[$widget_id] = new GtkEntry(); $width = $field_size[$widget_id]; $entry->set_size_request($width, -1); $gtkhtmlembedded->add($entry); $entry->show(); break; case 'button': $button = new GtkButton($widget_id); $button->connect('clicked', 'on_submit'); $gtkhtmlembedded->add($button); $button->show(); break; case 'vbox': $vbox = new GtkVBox(); $gtkhtmlembedded->add($vbox); if ($widget_id=='body') { $vbox->set_size_request(-1, 240); } else { $label = new GtkLabel($widget_id); $vbox->pack_start($label); } $vbox->show_all(); global $vboxes; $vboxes[$widget_id] = $vbox; // note 5 break; } return true; } ?> |
Output
As shown above.Explanation
The above code is based on How to embed gtk widgets within html text using gtkhtml?
What's new here:
- As explained in How to embed gtk widgets within html text using gtkhtml?, I still don't know how to retrieve the object ID in the signal handler. So in the meantime, I just do a hardcode mapping to get the object ID. If you know how to get the object ID, you can comment out these few lines. (Yes, please drop me a note to let me know how to do that too...!)
- Get the widget type.
- Get the widget ID.
- Create the buttons.
- Let's keep a record of all the pointers to the vboxes so that we can use them later.
- Just want to show you an example of how we populate contents in the vboxes (after we have created them in the signal handler).
Note
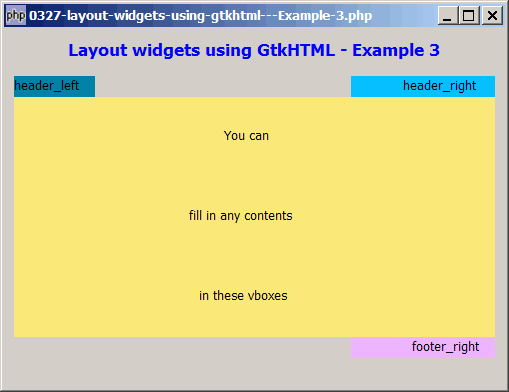
Try resizing the window. The header_right and footer_right stay at the right edge too as shown below!
Related Links
- How to layout widgets using gtkhtml - Example 2?
- How to align GtkEntry fields - Part 3 - using gtkhtml?
- How to embed gtk widgets within html text using gtkhtml?
- How to left or right align text using gtkhtml?
- How to left or right align GtkLabel in GtkWindow?
- How to create an html editor using gtkhtml - Part 2?
- How to create an html editor using gtkhtml - Part 1?
- How to display tooltips in GtkTable?
- How to display html text using gtkhtml?
- How to create a php gtk browser using gtkhtml - Part 1?
- How to create a php gtk browser using gtkhtml - Part 2 - click on links?
- How to create a php gtk browser using gtkhtml - Part 3 - zoom in and out?
Read more...