Problem
The example shows how to set up a simple yes-no dialog box, just like the previous example. However, to show you that there's really nothing "magical" in a GtkDialog, we will set up the buttons manually as shown below. This looks like a simple example. But it's the first step towards getting more control over GtkDialog.
Solution
- Set up two standard GtkButtons — one 'Yes' and the other 'No'.
- Register the signal clicked for these two buttons. Attach an integer to be passed along together with the signal to serve as the response_id when the button is clicked. Note that you can use any integer. Or you can use the pre-defined constant such as
RESPONSE_YESandRESPONSE_NO. - Set up an event handler for the button click. When a button is clicked, we manually emit a response signal using GtkDialog::response().
Sample Code
| 1 2 3 4 5 6 7 8 9 10 11 12 13 14 15 16 18 19 20 21 22 23 24 25 26 27 28 29 30 31 32 33 34 35 36 37 38 39 40 41 42 43 44 45 46 47 48 49 50 51 52 54 55 56 57 58 59 60 61 62 63 64 65 66 67 | <?php $window = new GtkWindow(); $window->set_title($argv[0]); $window->set_size_request(400, 120); $window->connect_simple('destroy', array('Gtk','main_quit')); $window->add($vbox = new GtkVBox()); // display title $title = new GtkLabel("Set up a simple yes/no dialog\n". "Part 3 - set up button manually"); $title->modify_font(new PangoFontDescription("Times New Roman Italic 10")); $title->modify_fg(Gtk::STATE_NORMAL, GdkColor::parse("#0000ff")); $title->set_size_request(-1, 40); $title->set_justify(Gtk::JUSTIFY_CENTER); $alignment = new GtkAlignment(0.5, 0, 0, 0); $alignment->add($title); $vbox->pack_start($alignment, 0, 0); $vbox->pack_start(new GtkLabel(), 0, 0); $vbox->pack_start($hbox = new GtkHBox(), 0); $hbox->pack_start(new GtkLabel('Response: '), 0); $hbox->pack_start($response = new GtkEntry(), 0); $hbox->pack_start($button = new GtkButton('Get Yes/No Response'), 0); $button->connect('clicked', 'on_click'); $window->show_all(); Gtk::main(); function on_click() { setup_yes_no_dialog(); } function setup_yes_no_dialog() { $dialog = new GtkDialog(); $dialog->set_title('Yes/No Dialog'); $label = new GtkLabel("Do you like PHP-Gtk2?"); $dialog->vbox->pack_start($label); $button_yes = GtkButton::new_from_stock(Gtk::STOCK_YES); // note 1 $button_no = GtkButton::new_from_stock(Gtk::STOCK_NO); // note 2 $button_yes->connect('clicked', 'on_ok_button', $dialog, 100); // note 3 $button_no->connect('clicked', 'on_ok_button', $dialog, 200); $hbox = new GtkHBox(); // note 4 $dialog->vbox->pack_start($hbox); $hbox->pack_start($button_yes); $hbox->pack_start($button_no); $dialog->set_has_separator(false); $dialog->action_area->set_size_request(-1, 1); $dialog->show_all(); $response_id = $dialog->run(); $dialog->destroy(); global $response; $response->set_text($response_id); // note 6 } function on_ok_button($button, $dialog, $response_id) { $dialog->response($response_id); // note 5 } ?> |
Output
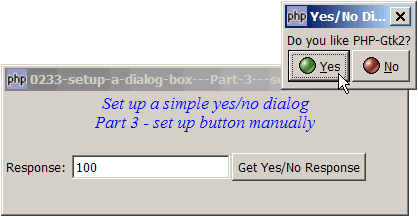
As shown above.Explanation
- Create the Yes button.
- Create the No button.
- Set up event handlers. Note how we pass the response_id along with the signals. For the response_id for Yes is 100, and for No is 200.
- Pack the two buttons inside a hbox.
- Manually emit the response signal.
- Echo the response. For
Yes, we have arbitrarily assigned it a value of 100. ForNo, the value is 200.
Related Links
- How to setup a dialog box - Part 1 - hello dialog?
- How to setup a dialog box - Part 2 - simple yes no dialog?
- How to setup a dialog box - Part 4 - non integer response id?
- How to setup a dialog box - Part 5 - get text entry?
- How to setup a dialog box of radio buttons - Part 1?
- How to setup a dialog box of radio buttons - Part 2 - make sure user selects?
- How to setup a dialog box of checkboxes - Part 1?
- How to setup a dialog box of checkboxes - Part 2 - check all and clear all?
- How to make a dialog stay for invalid input - Part 1?
- How to make a dialog stay for invalid input - Part 2 - ESC exit dialog?
- How to popup a dialog to select from list - Part 1 - select and click OK?
- How to popup a dialog to select from list - Part 2 - select with double click?
- How to popup a dialog to select from list - Part 3 - select by pressing enter?
- How to popup a dialog to select from list with search fields - Part 1?
Read more...