Problem
Besides GtkStatusIcon, one of the other most exciting widgets new to gtk+2.10 is the GtkAssistant — a widget for creating multi-step wizards.
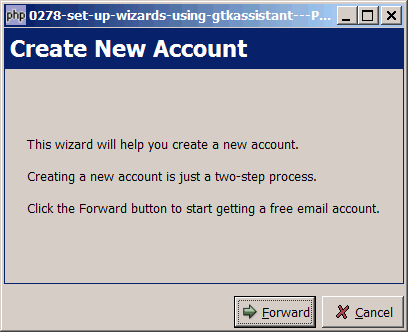
In this Part 1, I will show you the basics of setting up a GtkAssistant as shown below.
Solution
- Setting up a widget is simple with the new widget GtkAssistant available in gtk+2.10 and above.
- First browse through the sample code below. It's actually quite straightforward and self-explanatory.
- Please take note of the following:
- You can think of GtkAssistant as a GtkDialog. That's why you don't see any GtkWindow. It's used just like a GtkDialog. However, note that you do not use
$dialog->run()to start the loop. You still useGtk::main()like a GtkWindow. - For the main page, we usually set the page type to
Gtk::ASSISTANT_PAGE_INTRO. - For the last page, we usually set the page type to
Gtk::ASSISTANT_PAGE_SUMMARYorGtk::ASSISTANT_PAGE_CONFIRM. - Each page is just a GtkVBox. You can stuff any widgets you like in that vbox. You "add" this page to the wizard using
$assistant->append_page($vbox). - We use
$assistant->set_page_complete($page_num, true)to activate the Forward button. - The signal 'close' is emitted when the close button of a summary page is clicked.
Important Note: This only works for PHP-GTK2 compliled with gtk+ v2.10 and above. If you are using an older version, for linux, you may follow the step-by-step instructions to recompile php-gtk2 with gtk+ v2.10. For windows, please refer to How to install php gtk2 on windows? You may also want to take a look here to see some of the new exciting PHP-GTK2 Functionalities.
Sample Code
| 1 2 3 4 5 6 8 9 10 11 12 13 14 15 16 17 18 19 20 21 22 23 24 25 26 27 28 29 30 31 32 33 34 35 36 37 38 39 40 41 42 43 44 45 47 48 51 52 53 54 55 59 64 65 66 67 68 69 70 | <?php // setup button $assistant = new GtkAssistant(); // note 1 $assistant->set_title($argv[0]); $assistant->set_size_request(400,300); $assistant->connect_simple('delete_event', array('Gtk', 'main_quit')); //intro $vbox = new GtkVBox(); // note 2 $assistant->append_page($vbox); // note 3 $assistant->set_page_title($vbox, 'Create New Account'); // note 4 $assistant->set_page_type($vbox, Gtk::ASSISTANT_PAGE_INTRO); // note 5 $vbox->pack_start(new GtkLabel( // note 6 "This wizard will help you create a new account.\n\n". "Creating a new account is just a two-step process.\n\n". "Click the Forward button to start getting a free email account.")); $assistant->set_page_complete($assistant->get_nth_page(0), true); // note 7 $vbox->show_all(); // note 8 //Step 1 $vbox = new GtkVBox(); // note 9 $assistant->append_page($vbox); $assistant->set_page_title($vbox, 'Step 1 of 2'); $assistant->set_page_type($vbox, Gtk::ASSISTANT_PAGE_PROGRESS); $vbox->pack_start(new GtkLabel("This is Step 1.")); $assistant->set_page_complete($assistant->get_nth_page(1), true); $vbox->show_all(); //Step 2 $vbox = new GtkVBox(); $assistant->append_page($vbox); $assistant->set_page_title($vbox, 'Step 2 of 2'); $assistant->set_page_type($vbox, Gtk::ASSISTANT_PAGE_PROGRESS); $vbox->pack_start(new GtkLabel("This is Step 2.")); $assistant->set_page_complete($assistant->get_nth_page(2), true); $vbox->show_all(); //Done $vbox = new GtkVBox(); $vbox->pack_start(new GtkLabel( 'Congratulations! Your new account has been successfully created.')); $assistant->append_page($vbox); $assistant->set_page_title($vbox, 'Done'); $assistant->set_page_type($vbox, Gtk::ASSISTANT_PAGE_SUMMARY); $vbox->show_all(); $assistant->connect('close', 'on_close'); $assistant->show_all(); Gtk::main(); function on_close() { echo "You have clicked the close button\n"; Gtk::main_quit(); } ?> |
Output
As shown above.Explanation
- Create a new assistant.
- Create a new vbox.
- Add this page to the assistant.
- Set the page title.
- Set the page type.
- In this page, we only add a label to this vbox.
- Activate the forward button.
- Don't forget this!
- Repeat the above for pages 2 to 4.
Read more...